|
As we have seen, the classical use of the compass and straightedge as construction tools in Euclidean geometry is historically a long accepted manner of mathematical drawing. These tools can be applied to a wide variety of situations with mathematical precision.
This does not mean, however, that there are not other tools that may be used in the creation of geometrical constructions. Investigating of the use of a variety of construction tools may lead to a deeper understanding of the concepts at hand. Viewing constructions from different perspectives will offer a glimpse of how mathematical concepts are interrelated. Other construction tools include reflective devices (such as a Mira), string, semi-transparent folding paper (such as Patty Paper), and dynamic geometric software (such as Cabri, GSP, and GeoGebra).
Different construction tools have different strengths and weaknesses. It may be the case that a specific construction becomes easier, harder, or even impossible to complete with the use of a different tool. On this page, we will take a look at using a reflective device.
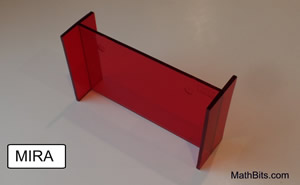
Reflective Device - the MIRA |
A MIRA is the commercial name given to a piece of colored transparent plastic used to reflect geometric objects. A Mira, unlike a mirror, allows the user to physically reach around the device to copy the image or to label points. A Mira cannot be used for creating circles. |
 |
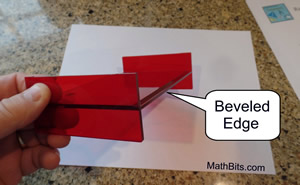
Hint: One of the longer sides of a Mira has a beveled edge for drawing. When you stand up your Mira, as shown in the photo above, place the side with the beveled edge on the paper. It may help if you place the beveled edge toward you, unless you plan to reach over the Mira to draw along its side. |
 |
Copying figures, finding reflections, and determining lines of reflection can easily be accomplished using a Mira.
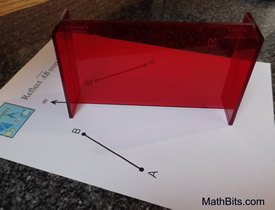
Copy a segment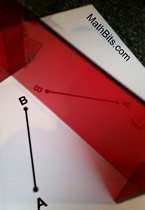 Place the Mira on your paper not intersecting the given segment. Looking through the Mira, you will see the segment reflected on the other side. Using your pencil, trace the reflected copy behind the Mira.
 |
Find reflection over a given line
 Place the Mira on the given line of reflection.
Look through the Mira to
Place the Mira on the given line of reflection.
Look through the Mira to
see the reflection on the other side.
Using your pencil,
trace the reflected
image on the other side of the Mira,
producing the reflection in the given line. |
Find the line of reflection
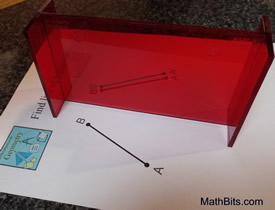 Place the Mira between the segments. While looking through the Mira, move the Mira until the left segment's reflection aligns with the right segment (behind the Mira). The Mira shown here needs to be moved a bit more to get alignment. When aligned, trace along the beveled edge of the Mira to get the reflection line.
 |
The constructions below are samples of constructions using a Mira.
Construct a bisector of a segment. |
Steps:
1) Given the line segment  . .
2) Place the Mira on your paper with the beveled edge on the paper.
3) Move the Mira around on your paper until the reflection of point A coincides with point B (as seen through the Mira).
4) Draw the line of reflection using the beveled edge as a guide.
5) The line is the bisector of the segment. |
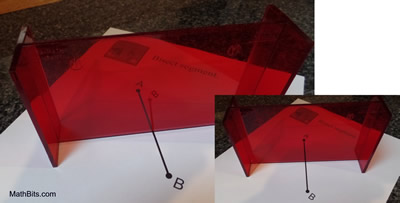 The left photo shows that points A and B are not yet aligned.
The right photo shows the points aligned. |
Construct an angle bisector. |
Steps:
1) Given the angle ∠ABC.
2) Place the Mira on your paper with the beveled edge on the paper.
3) Position the Mira such that the vertex of the angle coincides with the beveled edge of the Mira, and hold the Mira at this point.
4) Swing the other end of the Mira until you can see the ray  coincide with the ray coincide with the ray  through the Mira. through the Mira.
5) Using the beveled edge as a guide, draw the line of reflection which will be the bisector of the angle. |
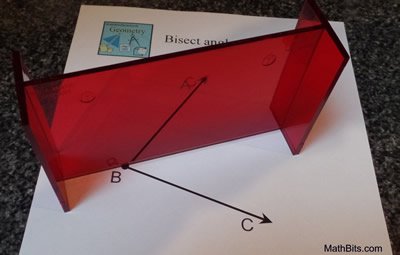
The photo shows the ray from B to C coinciding in the Mira
with the rays from B to A. The Mira is setting on the line
of reflection or the angle bisector.
|
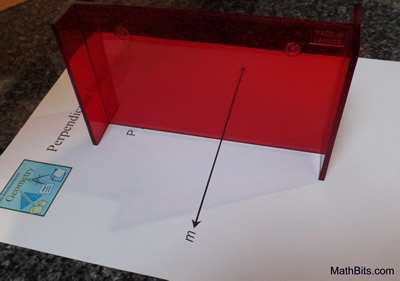
Construct a perpendicular from a point not on a line. |
Steps:
1) Given point P and line m.
2) Place the Mira on your paper with the beveled edge on the paper.
3) Position the Mira such that point P coincides with the beveled edge of the Mira.
4) Swing the other end of the Mira until the reflection of line m coincides with the actual portion of line m seen through the Mira.
5) Using the beveled edge as a guide, draw the line of reflection which will be the perpendicular to line m. |
The photo shows line m coinciding with itself when
reflected in the Mira, and the Mira lies on point P.
The Mira is the perpendicular bisector. |

NOTE: The re-posting of materials (in part or whole) from this site to the Internet
is copyright violation
and is not considered "fair use" for educators. Please read the "Terms of Use". |
|