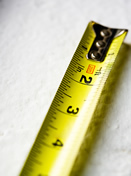
If the same object is measured with the same instrument by two different people, or even measured again by the same person, two different measurements may result.
This uncertainty in measurement is referred to as "variation" or "error". In this context, the word "error" does not mean a "mistake". An error in measurement is the difference between a taken measurement and the known actual value (the accepted true measurement) of what is being measured.
|
|
Terms Used in Expressing Error in Measurement:
Although the words accuracy and precision can be synonymous in every day use, they have slightly different meanings in relation to the scientific method.
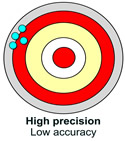
 Precision Precision is the degree to which repeated measurements under unchanged conditions show the same results. How close are your repeated measurements to one another?
[ Note: In the targets at the right, assume the "known" measurement to be the bull's eye. The first target illustrates how it is possible for measurements to be "precise", but not be accurate. All measurements are approximately the same, but none of the measurements are accurate.]
|
 |
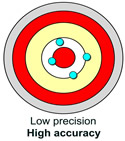
 Accuracy is a measure of how close the result of the measurement comes to the true, actual, or accepted measurement of the object. How close is your measurement to the known measurement of the object? Accuracy is a measure of how close the result of the measurement comes to the true, actual, or accepted measurement of the object. How close is your measurement to the known measurement of the object?
[Note: The second target illustrates how it is possible for measurements to be "accurate", but not be precise. All measurements are accurate, but
the measurements are not approximately the same].
|
 |
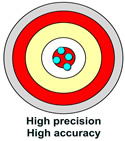
 A measuring system or instrument is described as being a "valid" system or instrument if it is both accurate and precise.
[ Note: A valid measuring device will yield a result such as that seen in the third target. Accurate AND precise. All measurements are accurate, and all measurements are approximately the same.] |
 |
The word precision may also be used to describe the level of detail that an instrument can measure. For example, a ruler marked in sixteenths of an inch is said to be more "precise" than a ruler marked in tenths of an inch. More "precise" measurements can be made on the first ruler. |
 The greatest possible error of a measurement is considered to be one-half of the measuring unit. If you measure a length to be 4.3 cm. (measuring to the nearest tenth), the greatest possible error is one-half of one tenth, or 0.05. This means that any measurements in the range from 4.25 cm. to 4.35 cm. are perceived as correct. The greatest possible error of a measurement is considered to be one-half of the measuring unit. If you measure a length to be 4.3 cm. (measuring to the nearest tenth), the greatest possible error is one-half of one tenth, or 0.05. This means that any measurements in the range from 4.25 cm. to 4.35 cm. are perceived as correct.
 The margin of error from 4.25 cm. to 4.35 cm. is referred to as a tolerance interval (the range in which measurements are tolerated). To determine the tolerance interval of a measurement, add and subtract one-half of the greatest possible error to the measurement (written as 4.3 ± 0.05 cm.). Machines used in manufacturing often set tolerance intervals to indicate product measurements which will be tolerated before being considered flawed. The margin of error from 4.25 cm. to 4.35 cm. is referred to as a tolerance interval (the range in which measurements are tolerated). To determine the tolerance interval of a measurement, add and subtract one-half of the greatest possible error to the measurement (written as 4.3 ± 0.05 cm.). Machines used in manufacturing often set tolerance intervals to indicate product measurements which will be tolerated before being considered flawed.
Representing Errors in Measurement:
There are different ways to calculate and represent errors in measurement.
 The absolute error is the difference between the measured value and the accepted (known) value. The absolute error is the difference between the measured value and the accepted (known) value.
The measurement
4.3 ± 0.05 cm. has a absolute error of 0.05 cm. (also the greatest possible error).
When the accepted value is not known, the absolute error becomes the greatest possible error.
|
Notice the use of absolute value.
Absolute error is reported as positive. |
Absolute error does not necessarily give an indication of the importance of the error.
Consider: If you are measuring the parking lot at the mall and the absolute error is 1 inch, this error is of little significance. If, however, you are measuring toothpicks, and the absolute error is 1 inch, then this error is very significant. For this reason, relative error is considered to be a more useful representation of error in measurement.
 The relative error shows the "relative size of the error" of the measurement in relation to the measurement itself. It can be expressed in two forms: one where the accepted measurement is known, and one where the accepted measurement is not known and the measured value is used in its place. The relative error shows the "relative size of the error" of the measurement in relation to the measurement itself. It can be expressed in two forms: one where the accepted measurement is known, and one where the accepted measurement is not known and the measured value is used in its place.
When the accepted measurement is known:
|
When the accepted measurement is NOT known:
|
Combining the formulas, we can write: 
 The percent of error is obtained by multiplying the relative error by 100. The percent of error is obtained by multiplying the relative error by 100.

 A measurement is taken to be 20 ± 0.05 m. What is the absolute error, the relative error and the percent of error? ANSWER: Absolute error = 0.05 m.

Since the accepted (true) measurement
was not known, the measured value was used.
Percent of Error = 0.25% |
|
